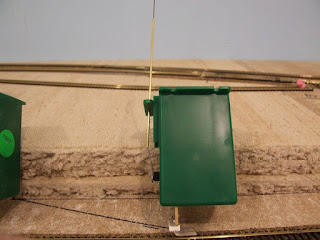
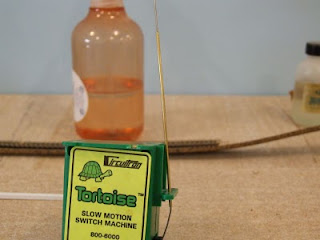
Last three day I finish prepping the switch machine that my friend Rich C started for me.
Due to my thick deck I have to modify the throw arm of the switch machine. One modification is just using a longer .032 dia. wire. Second one is reinforcing the .032 dia. wire with some 1/16" dia. brass tubing.
I use a small piece of double sided foam tape for temporary placement and the use a clamp above to prevent the wire from coming back out while I adjust the switch machine from below and finally anchor it with a couple of screws.
A few of the switch machine installed under the yard area.
Showing posts with label Switch Machine. Show all posts
Showing posts with label Switch Machine. Show all posts
Wednesday, May 16, 2012
Sunday, May 13, 2012
Progress - 13 May 2012
This week I got the yard ladder in and I had a visit by my MRR buddy Rich Saturday evening. The week started with locating and drilling the throw wire and frog wire holes for the turnouts. Determining the length and cutting of the small pieces of track between turnouts.
Then prep the nine turnout switches. I isolate the frogs by cutting gaps in the wing rails and soldering jumpers from the outside rail to the wing rails and add a wire to the frog for power. I also remove the Peco point spring. You can see more detail in earlier post.
Here the finish yard ladder installation started Thursday evening thru Sunday morning. More would have been accomplished but I ran out of magnets for my uncouplers and was only able to install the caboose/MOW track. Once the magnets arrive (my local source stop carrying the ones I was using) I will complete the yard area track. I will be moving on to installing the 15 tortoise switch machines next for all the work complete in the last few weeks.
Rich started the prep (during his visit) on my tortoise machines by soldering on a connector I like using. Thanks Rich. Next will be to create the new throw rod for my thick deck.
Thanks for following.
Sunday, November 27, 2011
Back on Track
I had a good thanksgiving week and weekend, got the staging control working and finished installing all mainline track feeders, installed two reversing unit and two more control panel frames.
Now I am able to run a train for the complete layout. Sorry no video as this is something I need to learn how to do (make and post here).
An couple of hours of running show a few problems, but all were easy fixes.
Here is a photo of the working staging control panel
Next up, add mainline and industry turnout control to all installed panels. Clarksville above photo (lower half of panel) is mostly done, need wiring to switch machine and program one accessory decoder.
Sunday, October 23, 2011
Control Panel - More Panel Progress
Since the last post I have spend little time on the Layout, but some progress has been made.
First, more wiring inside the first control panel
Second, wiring of the Diode-Matrix and Relay board
Third, Mount and started wiring of the CAT 5 Punch-Block blocks for Tortoise Switch Machine wiring termination
First, more wiring inside the first control panel
Second, wiring of the Diode-Matrix and Relay board
Third, Mount and started wiring of the CAT 5 Punch-Block blocks for Tortoise Switch Machine wiring termination
Sunday, March 20, 2011
Tortoise Switch Machine - Thick Deck Mod.
My layout has a 1/2" plywood deck and I am creating elevations by stacking ceiling tiles, so in some area's I need to extend the switch machine throw rod.
This requires beefing up the 0.032 spring steel I use for throw rod. I accomplish this by installing a piece of 1/16" Brass tubing from K&S.
This requires beefing up the 0.032 spring steel I use for throw rod. I accomplish this by installing a piece of 1/16" Brass tubing from K&S.
Friday, March 18, 2011
Tortoise Switch Machine - Prep
I am going to re-use my switch machines from my HO Layout, so I thought I would show you how I am prepping them.
First - I do not use the throw wire that comes with the machine I substitute a 0.032 Dia. wire.
Second - I add a connector to the machine
So I can plug on my wiring harness
Here is the info on these connectors
First - I do not use the throw wire that comes with the machine I substitute a 0.032 Dia. wire.
Second - I add a connector to the machine
So I can plug on my wiring harness
Here is the info on these connectors
Subscribe to:
Comments (Atom)


